How to Make a Leaf Arrangement (P5.js tutorial)


This is a tutorial explaining how the code was used to create the corresponding blog ‘Geometry, and the Role It Plays in Leaf Arrangements'.’
A note: Another great blog on this.
The mix of nature and math has been the core of my practice, and so I’m writing this tutorial on how I create a spiral phyllotaxis pattern in p5.js. I wrote a larger piece describing the phenomena of geometry in plant life, so check that out if you want more context.
Gourmet Data is a reader-supported publication. To receive new posts and support my work, consider becoming a free or paid subscriber.
A Primer on Leaf Petals
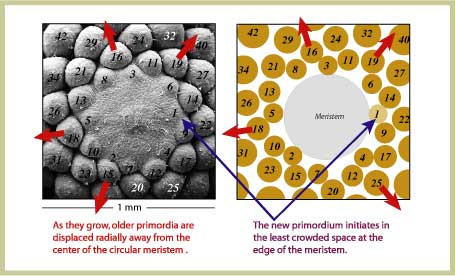
In spiral phyllotaxis patterns, such as those observed in certain flowers, petals grow sequentially from a central point, known as the apical meristem. The apical meristem is essentially what I wanted to code using P5.
The meristem’s primary function is to continuously generate new cells, which is vital for the growth of young seedlings. This process is highly organized, with the apical meristem divided into different zones, each playing a specific role in developing various plant parts.
Now, we’re not gonna get too much into that nitty-gritty, but the most important thing to know is that the apical meristem follows a distribution in accordance to the golden angle, approximately 137.5 degrees between each newly formed shoot or root.
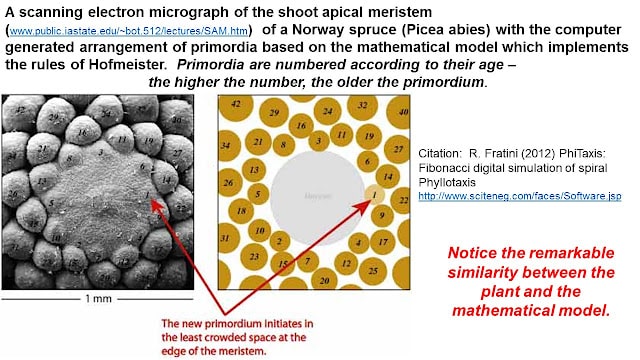
As a result, it's important to consider flower petals as a system of petals rather than an individual entity. The resulting arrangement reveals a lot about the plant’s structure and genetic makeup.
More specifically,
- Several biological plants have settled on a distribution system based off the golden angle, so something about it makes it efficient for survival.
- The golden angle distribution is efficient because it allows each petal to have maximum possible exposure to sunlight and space, and minimizes overlap with other petals.
- The resulting arrangement looks dope af
Starting off with P5.js Basics
The heart of our code is this: we are going to create leaves and distribute their positioning based off the golden angle.
To start, we’ll set up a few boilerplate things. This boilerplate will include a list of variables that will affect our final image, and you’ll notice the golden angle included. Don’t worry if you don’t understand everything now; I’ll get to them later in the blog.
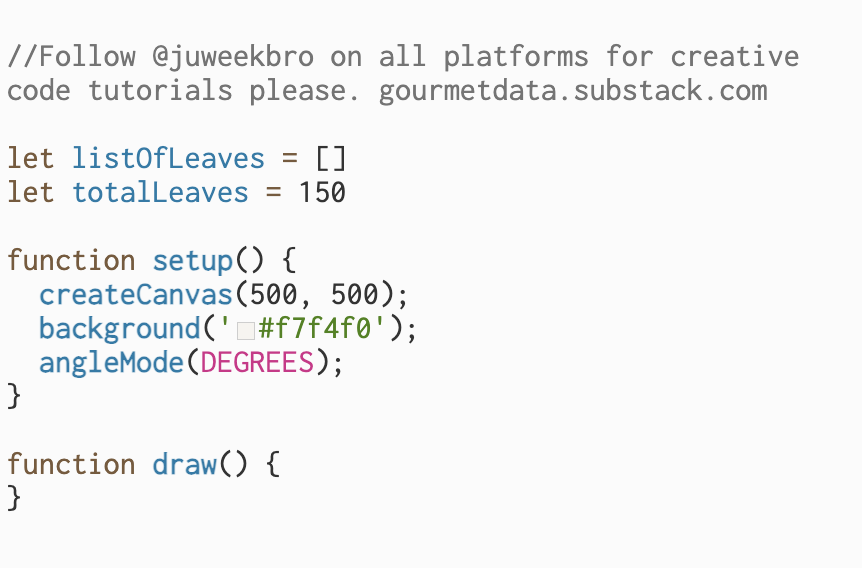
I did want to turn on angleMode() because they basically change the way our values are interpreted. They are not necessary for this type of animation in p5, but they are two fun lines to test out.
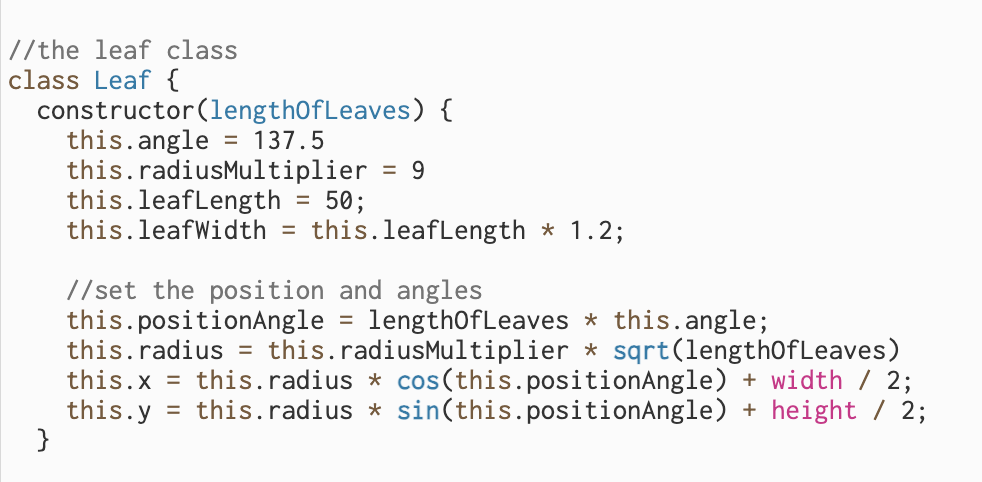
Coming up with the Leaf() object
A common theme for my P5 tutorials is the idea of a constructor. It’s a common theme in code; in ReactJS, we refer to them as props.
With the Leaf() class, we start with defining some variables. Some things (leafLength, x, y) are more obvious than others (radiusMultiplier, positionAngle).
So, a quick breakdown:
this.anglewill be 137.5, or the golden anglethis.radiusMultiplieris somewhat arbitrary.this.rrepresents the radius from the center, and determines how far from the center each new leaf will appear, calculated based on the total number of leaves and the radius multiplier. So radiusMultiplier is more of an aesthetic choice than anything.this.leafLength: The initial length of the leaf, set to 50this.leafWidth: Calculated as 60% of the leaf's lengththis.positionAngle: The angular position where the leaf will grow. We will calculate this using the total number of leaves and the golden angle (137.5 degrees). Doing it this way ensures each new leaf is placed at a specific angle from the last, forming the spiral pattern.this.xandthis.y: Initial coordinates of the leaf, set to sin and cos to mimic a circle.
Displaying the Leaf() objects
Display() and update() are common functions for P5 classes, so we’ll work on them next. Display() will determine how the leaf will look. The length, height, color, and other elements we defined in the constructor will be used in this function.
Here’s the total function; let’s break it down into two chunks:
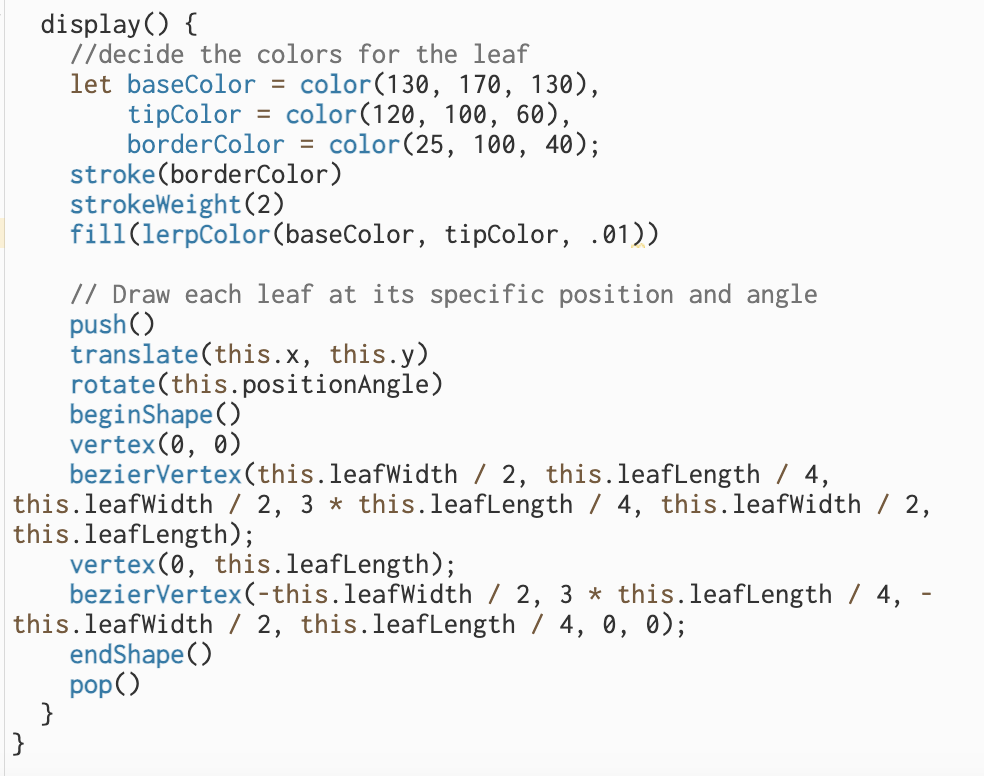
The method starts by setting up the colors for the leaf. It defines three distinct color variables - baseColor, tipColor, and borderColor. These colors are used to give each leaf a vibrant look with a gradient effect. The lerpColor function is used to create a gradient as the leaf ages, simulating a natural maturation process. The stroke and strokeWeight functions are used to define the leaf's border, giving it a distinct and crisp outline.
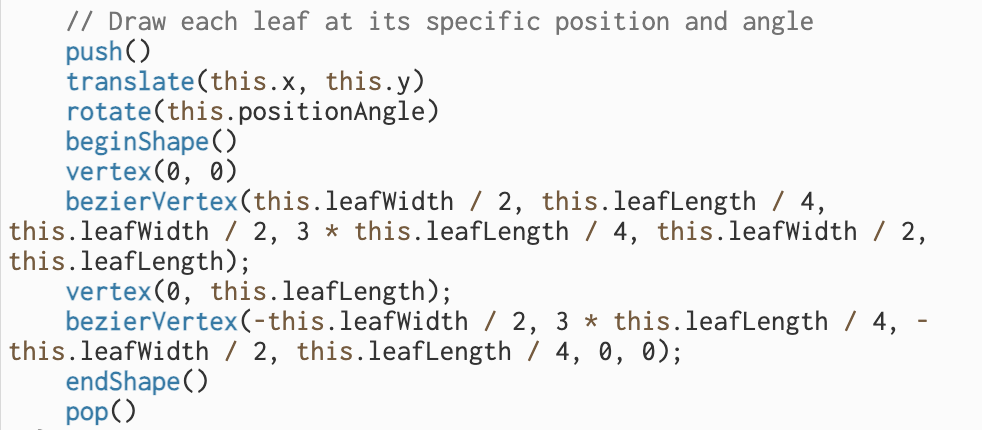
After dealing with the colors, we then use the push() and pop() functions.
We are going to draw the leaves one by one, rotating them and translating them according to the the values we had in our constructor. Starting off with push() ensures that each leaf's transformations are isolated, as opposed to applying to the full canvas. translate(this.x, this.y) moves the drawing context to the leaf's current position and the rotate(this.positionAngle) function aligns the leaf at the correct angle, adhering to the spiral pattern.
Finally, the shape of the leaf is drawn using bezier curves, which allows us to draw curvy lines between vertices. The beginShape() and endShape() functions encapsulate the drawing commands, and using bezierVertex() allows for the curve shape to be more rounded rather than linear vector coordinates.
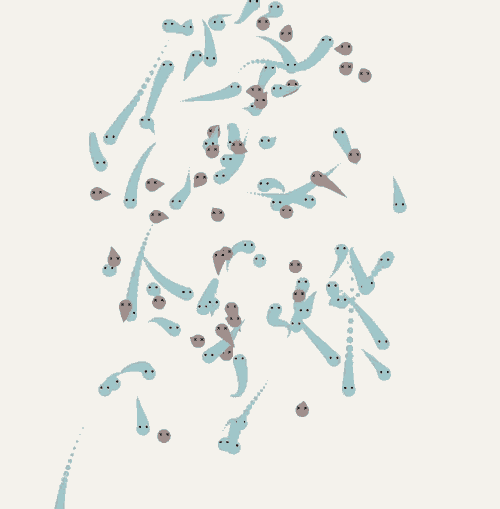
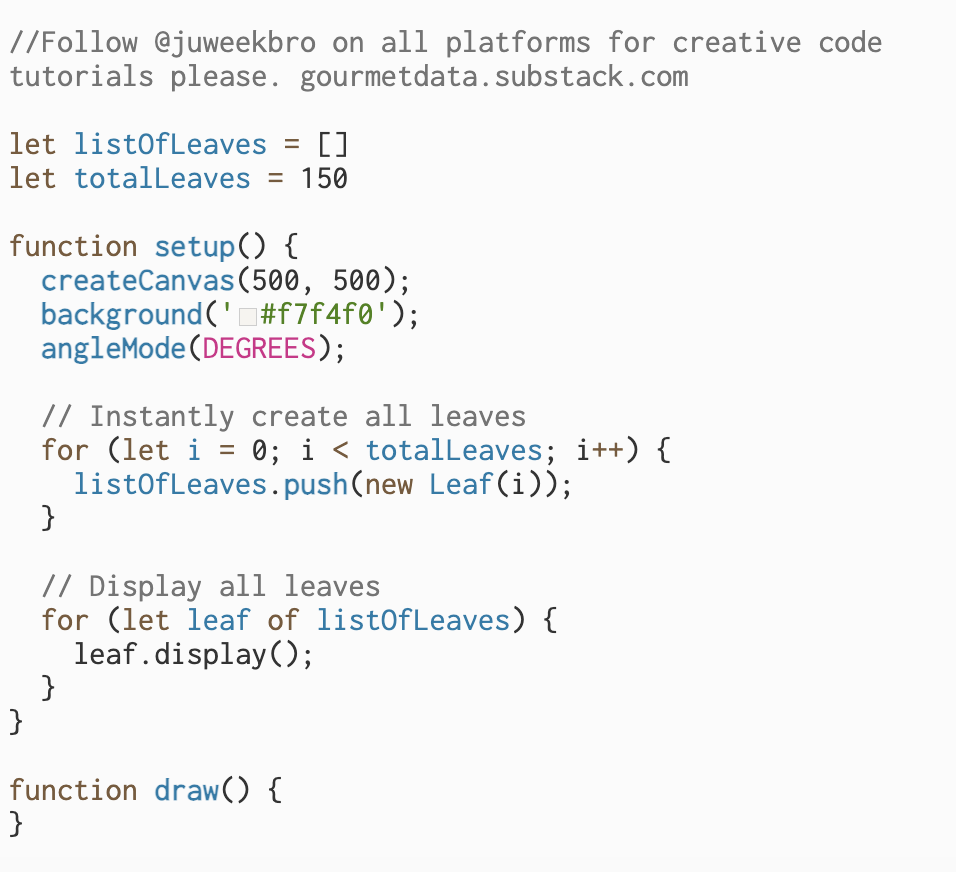
In our main js file, we simply need to create the leaves and draw them, and we will be able to get the static arrangement below.
Animating the Leaf() objects
With the above code, we should be able to have an arrangement of static leaves. Here’s a link to just the static arrangement code.
That being said, there is something nice about being able to see the leaves grow from the middle. A picture is worth a thousand words, and an animation is worth a thousand frames.
As I mentioned, in the apical meristem, growth follows a specific sequence, with each new petal or plant element (like leaves or seeds) emerging one after the other. And, as new leaves are added, their position is slowly pushed out.
As a result, we’ll change how we create a leaf. Instead of predefining its point, we’ll create them one by one in the middle, and then push and rotate them around a circle.
As we’re going to draw this sequentially, we’ll move this code out of the setup() function to the draw() function, and change the constructor for the Leaf object.
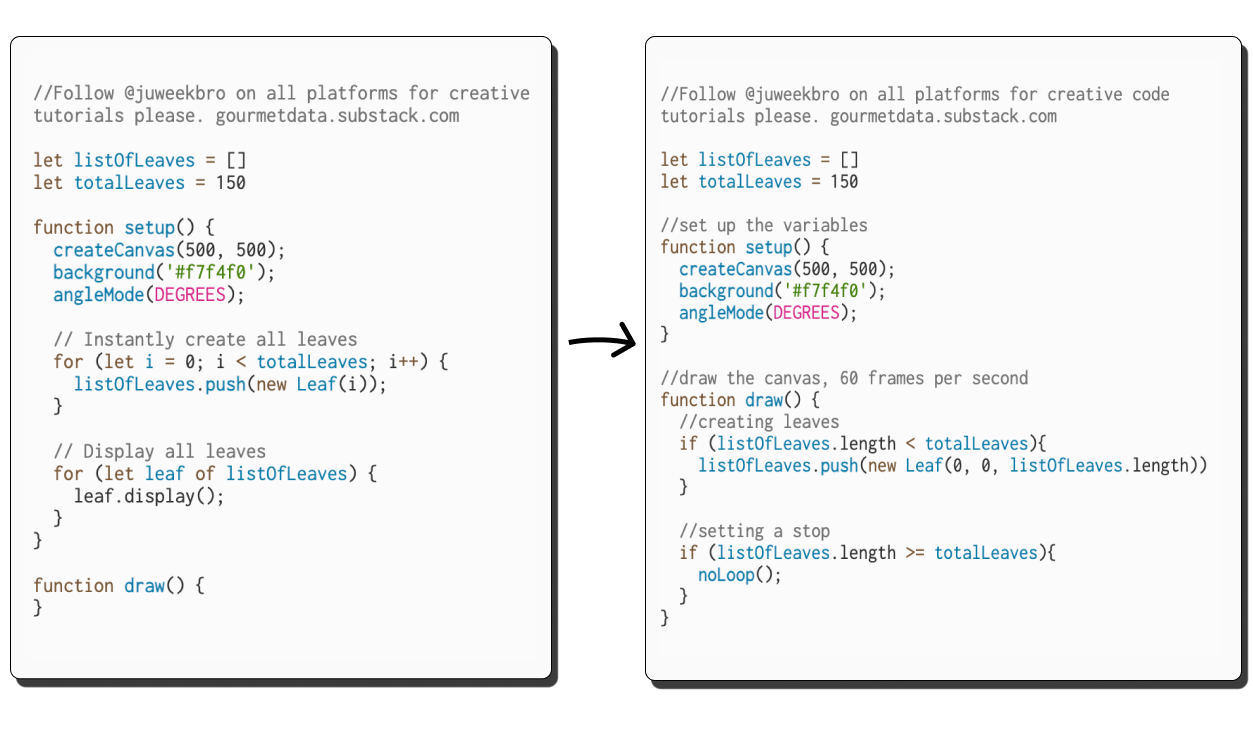
In our update() function, we’ll slowly push out the leaves, slightly changing their x and y positions based off the principles of sin/cos, using the positionAngle as an anchor.
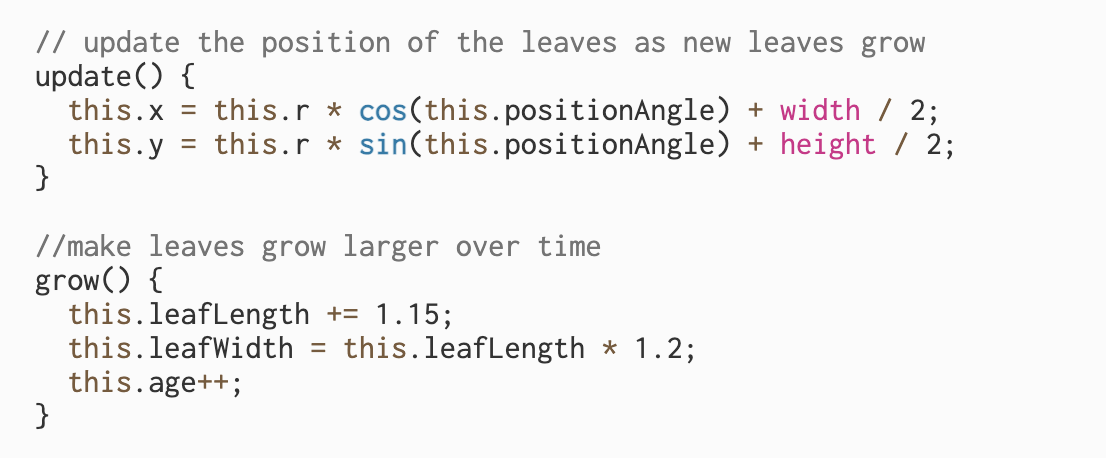
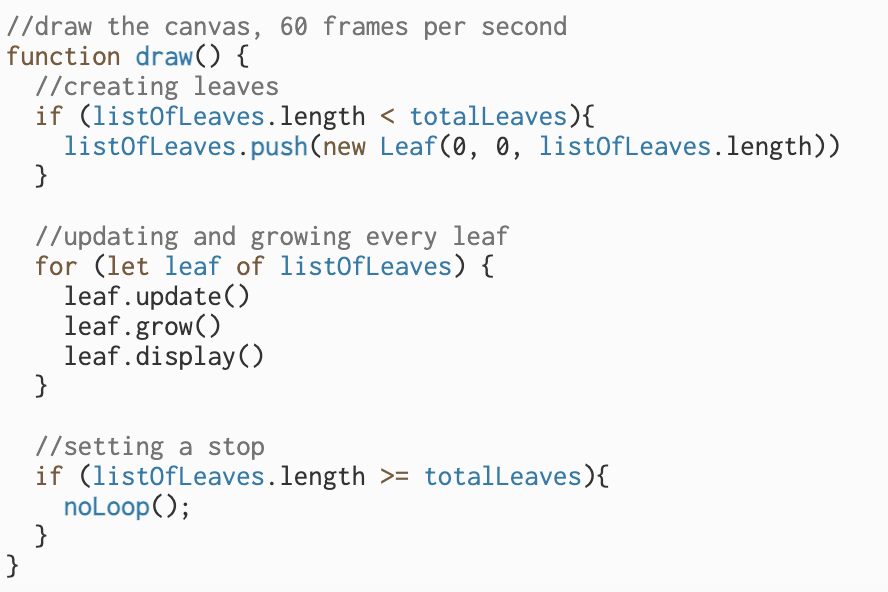
Then, in the main P5 file, we can rely on draw() to sort this whole thing. For In the draw function, as we continue to call the draw() function, we can call a loop that cals both the update() and grow() functions. So, our draw() function will now look like this:
Conclusion
That’s it, folks. Hopefully that was helpful.